
Being that it is Memorial Day weekend, barbecues around the country are making countless burgers and hot dogs. Why not make yours a little bit more exceptional than the norm?
Today I prepared Cheddar-Stuffed Burgers. They are easy, delicious, and can be customized an endless number of ways. The best part is HOW I prepare my burger patties in the perfect shape every time!
What You Will Need:
- 2 pounds of ground beef
- 2″ Wide Block of Cheddar
- Salt
- Pepper
- Baking Sheet
- Aluminum Foil
- 2 Cup Measuring Cup
- Cutting board or mat
- Paper towels
Notes:
- I used 85% Beef/15% Fat ground meat. I usually stick to this or 90% Beef/10% Fat ground meat. If you go with a higher fat percentage your burgers will be too greasy, and any lower than this fat percentage your burgers will be very dry.
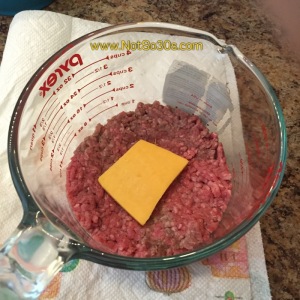
- I used a 2 cup measuring cup, as it is what I had handy that was circular. Feel free to use the small round take-out containers you find at your local deli. Basically, you want something with about a 4″ diameter.
- Do not pre-mix your ground meat with seasonings. Hand mixing the ground beef results in a chewier and dried burger. This is due to the heat in your hand melts and emulsifies the fat in the ground meat.
Instructions:
- Cover your baking sheet in aluminum foil. Try to make the foil as flat on the sheet as possible. It won’t be perfect, but smooth it out as much as you can before you wrap the foil around the edges of the sheet.
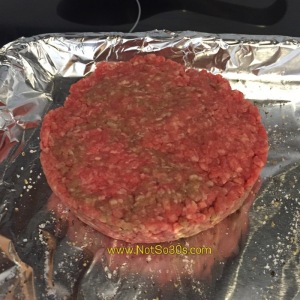
- Salt and Pepper the foil. Yea. You read that right. You will understand this step later. Make it look something like this.

- Slice your block of cheddar cheese. Keep your slices to 1/4″ or less. Set aside.
- Place 2 paper towels (stacked) on top of a cutting board or mat. Set aside.
- Grab golf ball-sized amount of meat and GENTLY press it down into the bottom of your measuring cup. Try to have as little hands-on time as possible. I use the back of my fingers to gently press the meat down. If you need to add a little more meat, go ahead. You want a layer at the bottom of the cup, and not so thin as it will crumble apart when you try to take out the patty later.
- Place one (or two if you are feel crazy) slice of cheddar in the middle of your patty. (Warning: If you decide to go crazy and add two slices, you will need extra meat to cover the cheese and it may result in an over-sized burger patty that may not cook as evenly.) I gently press the cheese into the patty, just to slightly wedge it in place. Your patty should now look like this. You should have no holes on the lower portion of the patty.
- Grab another golf ball-sized piece of meat and place it on top of the meat. Now, gently press the meat down and out towards the edge of the measuring cup.
- Once you have an even top layer of your patty, and can not see the cheese, prepare for war! I mean, to knock the patty out of the cup.
- While holding both side of the measuring cup, turn over the cup and give it a few solid WHACKS on the cutting board (on top of the paper towels) to knock the patty out of place.
- Lift the patty up and place it on top of your seasoned aluminum foil. (Voila! The bottom of your burger is now seasoned!)
- Repeat steps 5 – 10 with the rest of your ground meat and cheese.
- Once all of your patties are ready, season the top with salt and pepper.
- You are now ready for the grill! ENJOY!

I experimented with two different sized measuring cups here. Unless you want a hockey puck, stick with the larger 2 cup measuring cup


